Instead of copying every new lead into your CRM, set up a Zapier workflow that sends lead details to Mesh App when a supported connection is available. The first step is to verify how your Mesh App account accepts new contacts; a Zapier trigger alone cannot create them.
- A mesh app zapier integration needs a verified Mesh App action or a supported API endpoint before it can create contacts.
- Mesh App is best for small and medium-sized businesses that want lead details in the same CRM/ERP platform as their other work.
- Test one lead, check the contact record, and prevent duplicates before publishing the workflow.
Why this matters
A lead can arrive through a form, a booking tool or another system while the person responsible for following up works in a CRM. Re-entering the details creates another task and another chance to mistype an email address or lose the lead source. Mesh App offers contact management alongside project management, time tracking, invoicing and finance modules, so the useful outcome is a contact record your team can recognize and follow up.
The setup question in 2026 is not whether Zapier can receive a lead. It is whether your Mesh App account has an authorized way for Zapier to create or update the corresponding record. Mesh App is best for small and medium-sized businesses that need a CRM/ERP contact record; its Zapier connection method must be confirmed before you build the automation. This guide separates that check from the steps you can configure in Zapier.
Before you start
- Get access to the lead source and Zapier. You need permission to connect the app where a new lead arrives and to test its trigger with a sample submission. Use a test lead you can identify and remove or correct later.
- Confirm a Mesh App write method. Check whether your account has a usable Mesh App action in Zapier or whether Mesh App provides an API endpoint and credentials for creating contacts. Confirm the required fields and permissions with your administrator or Mesh App's current documentation. Do not treat the existence of a Zapier trigger as proof that a Mesh App action exists.
- Choose a duplicate rule before testing. Decide how the team identifies an existing contact, such as by email address. A create-only workflow can add another record when a person submits a second form; an update workflow needs a supported search or lookup method.
The non-obvious setup blocker is the destination, not the source. If you cannot verify an authorized contact-creation method, stop before entering a live lead into a Zap. You can still define the field mapping and prepare a test, but you cannot finish a direct Mesh App lead workflow by guessing an endpoint or selecting an unrelated Zapier action.
Choose the Mesh App connection method
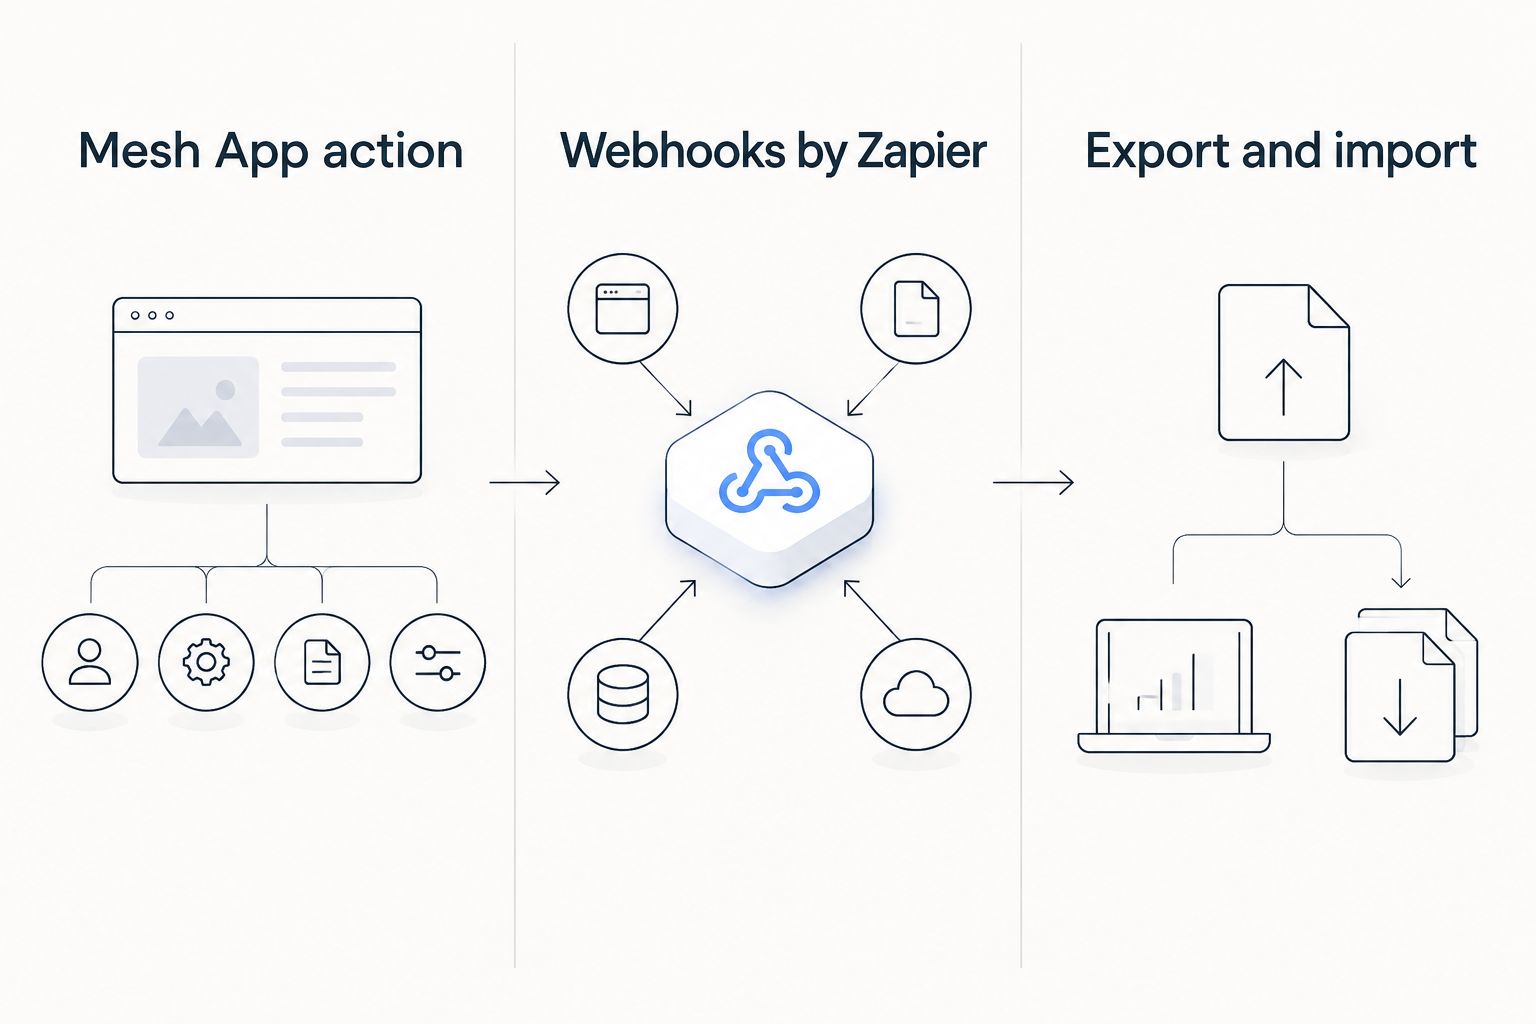
There are distinct routes for moving a lead, and they are not interchangeable. Select one that your account actually supports in 2026.
| Route | Best for | What you must verify | Limitation |
|---|---|---|---|
| Mesh App action in Zapier | Teams with an available contact-creation action | The action appears for your account and accepts the fields you need | Available actions and permissions must be checked before setup |
| Webhooks by Zapier | Teams with a documented Mesh App API endpoint | The endpoint, authentication method, request format and contact fields | An undocumented or unauthorized endpoint is not a working connection |
| Export and import | Teams without a verified direct write method | The supported import format and duplicate-handling process | It does not create Mesh App contacts automatically |
Use the first supported route, not the first one that looks plausible. If a Mesh App action exists, it avoids constructing an API request yourself. If your account instead provides a documented API, a webhook is a possible route, but its request must follow that documentation exactly. An export gives you a controlled fallback while access is being confirmed; it does not satisfy a request for live lead automation.
Set up your lead trigger
The trigger decides which event starts the workflow. The instructions below apply to the lead-source app you select in Zapier; its event names and available fields depend on that app.
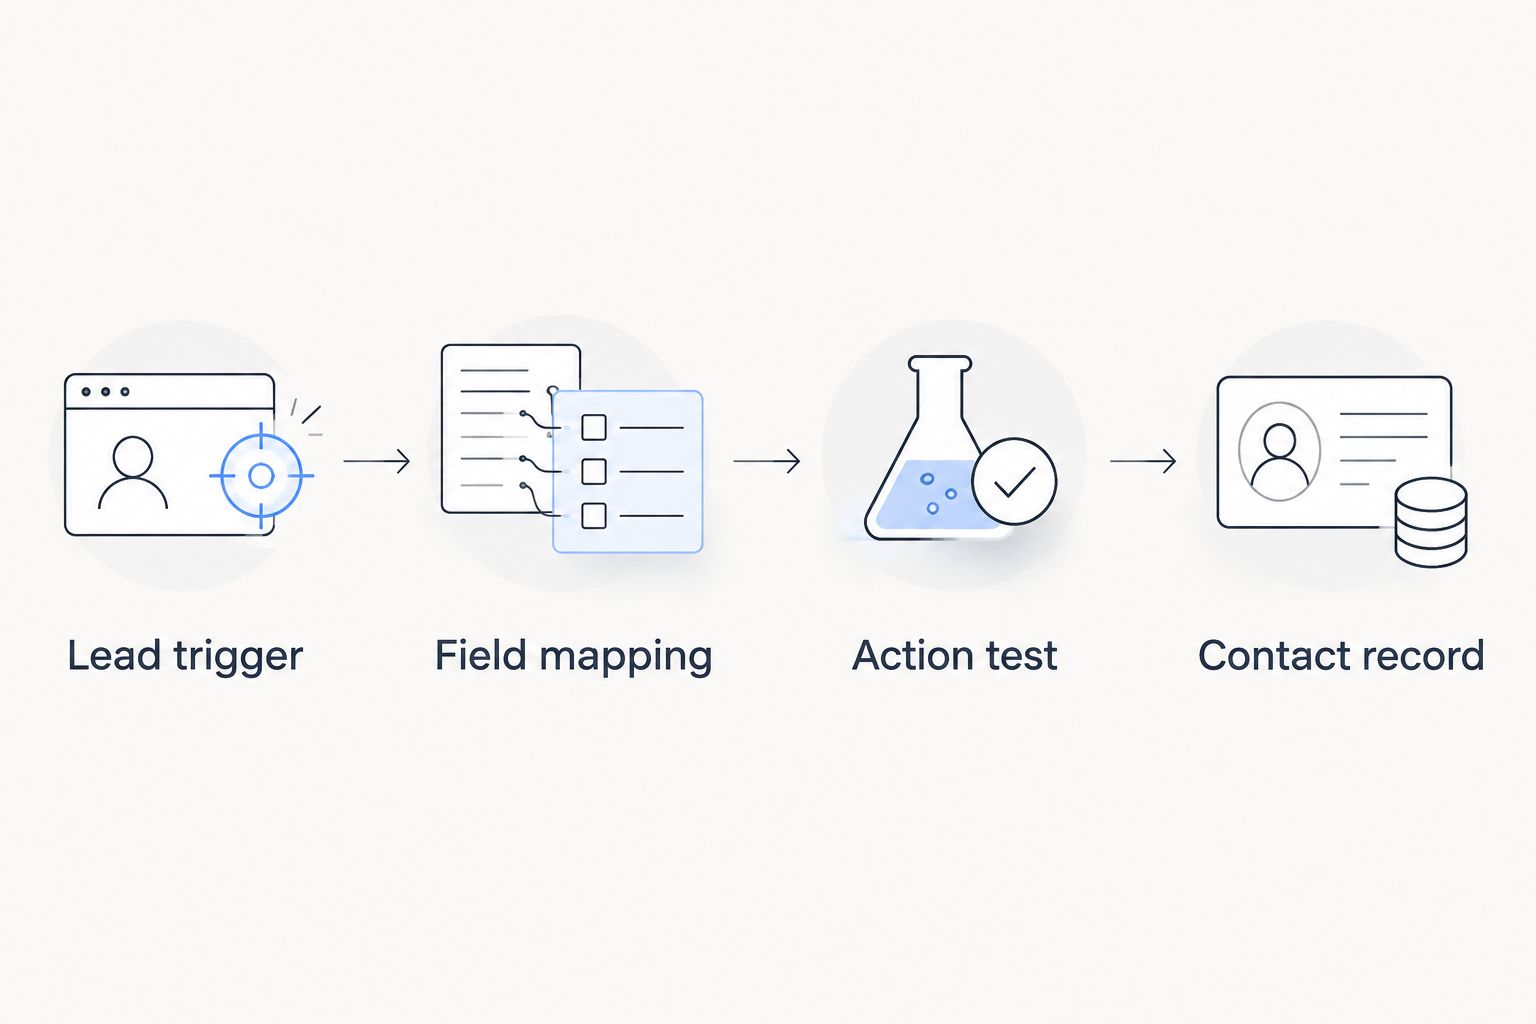
- In Zapier, select Create and start a new Zap. Choose the app that receives the lead in the Trigger step. Select its new-submission or new-lead event, using the event name shown for that app.
- Connect the lead-source account and choose the specific form, list or pipeline that should start the Zap, if the app requests one. Do not choose every form by default: unrelated submissions make the contact list harder to use.
- Submit a test lead through the source. Include an email address you can search for, a name and any lead-source detail your team needs to preserve. In Zapier, use Test trigger to inspect the sample returned by the source app.
- Check the sample field by field. If the email, name or source is blank in the trigger result, fix the source form or choose a different sample before configuring Mesh App. Mapping a blank sample does not tell you whether the finished Zap will have the data it needs.
Expected result: Zapier displays a test submission from the intended lead source with the fields you plan to send. In 2026, this confirms the trigger only; it does not confirm that Mesh App can receive the lead.
Configure the Mesh App destination
If you verified a Mesh App action in Zapier, use that action. If you verified a documented Mesh App API instead, configure a Webhooks by Zapier action using the endpoint and authentication instructions supplied for your account. The two routes share the same mapping decisions, but their setup screens and required credentials differ.
- Add an Action step. Search for Mesh App and select a supported contact-creation event if one is available to your account. Otherwise, select Webhooks by Zapier only when you have confirmed that an authorized Mesh App API endpoint supports the request you need.
- Connect the authorized account. For a webhook, enter the documented endpoint, request method, authentication details and request format. Do not put credentials into a field intended for lead data, and do not invent a Mesh App URL from its website address.
- Map the trigger's name and email fields to the destination's corresponding contact fields. Map a source label only when the destination has a suitable field. Keep the value tied to the actual form or channel so a contact record shows where the inquiry began.
- Review any fields the destination marks as required. Supply values from the source submission or stop and collect the missing information upstream. Avoid putting several unrelated details into one contact field merely to make the test pass.
- Run the action's test with the identifiable test lead. Open Mesh App separately and search for the resulting contact. Check its email, name and source detail against the trigger sample before you publish the Zap.
Expected result: You can find one contact record containing the test lead's intended details. A success message in Zapier is not enough; verify the record in Mesh App. If the action test fails, leave the Zap unpublished while you check the error and the destination's documented requirements.
Check duplicates and publish
A second submission from the same person is a useful final test. It tells you whether the workflow creates another contact, updates the existing one or stops. Choose the behavior your team wants rather than assuming Zapier or Mesh App will merge records for you.
- Search the available Mesh App actions or documented API functions for a contact lookup based on the identifier you chose, such as email. Add that lookup before a create action only if the supported connection provides it.
- Define what should happen when the lookup finds a match. An update requires a supported update action or endpoint; a create action alone cannot safely stand in for it. Decide which fields an update is allowed to replace so a new form submission does not erase useful notes.
- Submit the test lead again and inspect the result in Mesh App. Confirm whether you have the intended record behavior and that the lead-source detail remains understandable.
- Publish the Zap only after both a first submission and a repeated submission behave as intended. Give the workflow a name that identifies the lead source and destination so the team can recognize it later.
Expected result: New and repeated submissions follow a rule you have tested. If your verified connection supports creation but not lookup or update, document that limitation and handle repeat leads separately instead of claiming the workflow deduplicates them.
Update a contact when a lead changes
A related 2026 workflow starts when an existing lead is updated in the source system, rather than when a new one arrives. Use it only if the source app offers a suitable update trigger and your Mesh App connection offers a way to find and update the correct contact. This variant does not require a different lead strategy; it requires a reliable match.
Set the source app's update event as the trigger, test it with a changed lead, then look up the corresponding Mesh App contact by your chosen identifier. Map only the fields the change should update. For example, if a form system changes a lead's phone number, verify that the update targets the existing contact rather than creating another one. Check the record after the test and publish only when the expected field changes without replacing unrelated details.
Do not use a new-lead trigger as a substitute for an update event. Zapier can act on the events a source app exposes, not on a change it never receives. If either system lacks the event or write method you need, keep the original new-lead workflow and update existing contacts through a supported process.
Troubleshooting
- Mesh App does not appear as an action. Check the app search and the connection options available to your account. Do not select another app with a similar name. Ask your administrator to confirm whether a documented API route exists; otherwise, a direct Zapier-to-Mesh App workflow is not ready to configure.
- The test trigger has missing fields. Inspect the actual source submission and select a sample that contains the data you need. If the source never collects the field, add it there or remove it from the destination mapping.
- A webhook test is rejected. Compare the endpoint, method, authentication and request format with the Mesh App documentation supplied for your account. A website URL is not automatically an API endpoint, and a successful trigger test does not validate webhook credentials.
- Zapier reports success but you cannot find the contact. Confirm that you are viewing the same Mesh App account used for the action test. Search by the exact email address in the sample and inspect what the destination step returned.
- A repeat submission creates another contact. Check whether the Zap contains a supported lookup and update path before its create step. If those capabilities are unavailable, do not describe the workflow as duplicate-safe.
Customize your workflow
Once a new lead reaches the correct contact record, decide what the team needs for follow-up. For a consulting or IT inquiry, that can mean preserving the service requested; for a trade or construction inquiry, it can mean retaining the job description supplied by the lead. These are mapping choices, not claims that a particular Mesh App field or automation exists. Confirm the available fields in your account before adding either detail.
Keep the first 2026 version narrow: one source event, one verified destination method and a test your team can repeat. Add more sources only when you can identify each one in the resulting contact data. If different forms collect different information, test each mapping separately instead of assuming the first form's sample represents them all.
Check Mesh App for your workflow
Review the CRM/ERP platform before choosing a lead connection method.
FAQ
Can I connect Mesh App to Zapier in 2026?
A direct connection depends on a verified Mesh App action in Zapier or a documented, authorized Mesh App API endpoint. Confirm the write method for your account before building a live lead workflow.
What do I need before setting up a mesh app zapier integration?
You need access to the lead-source app, Zapier and a verified way to create contacts in Mesh App. Prepare a test lead and decide how repeated submissions should be handled.
Can Zapier create Mesh App contacts from a form submission?
Zapier can start a workflow from a supported form trigger, but contact creation requires a supported Mesh App action or API request. Test the destination and verify the resulting record in Mesh App before publishing.
Does a successful Zapier trigger test mean the integration works?
No. It confirms that Zapier received the source event, not that Mesh App accepted a contact. Run a destination test and inspect the contact record separately.
How do I prevent duplicate contacts from repeated leads?
Use a supported contact lookup and update path before creating a new record. If your verified connection does not provide those operations, handle repeat leads separately rather than assuming automatic merging.
Can Zapier update an existing Mesh App contact?
An update workflow requires both a source update trigger and a supported Mesh App contact lookup and update method. Test the match and the changed fields before publishing it.
What if Mesh App is not available as a Zapier action?
Check whether your account has a documented API method that Webhooks by Zapier can call. Without a verified write method, use a supported manual transfer process instead of guessing an endpoint.
One last thing
Test the same lead twice in 2026. The first submission shows whether a contact can be created; the second exposes what happens when a real person returns. That second result determines whether your lead automation keeps the CRM usable or adds cleanup work.